Network Overview
Assume that we have a typical testbed looks like this:
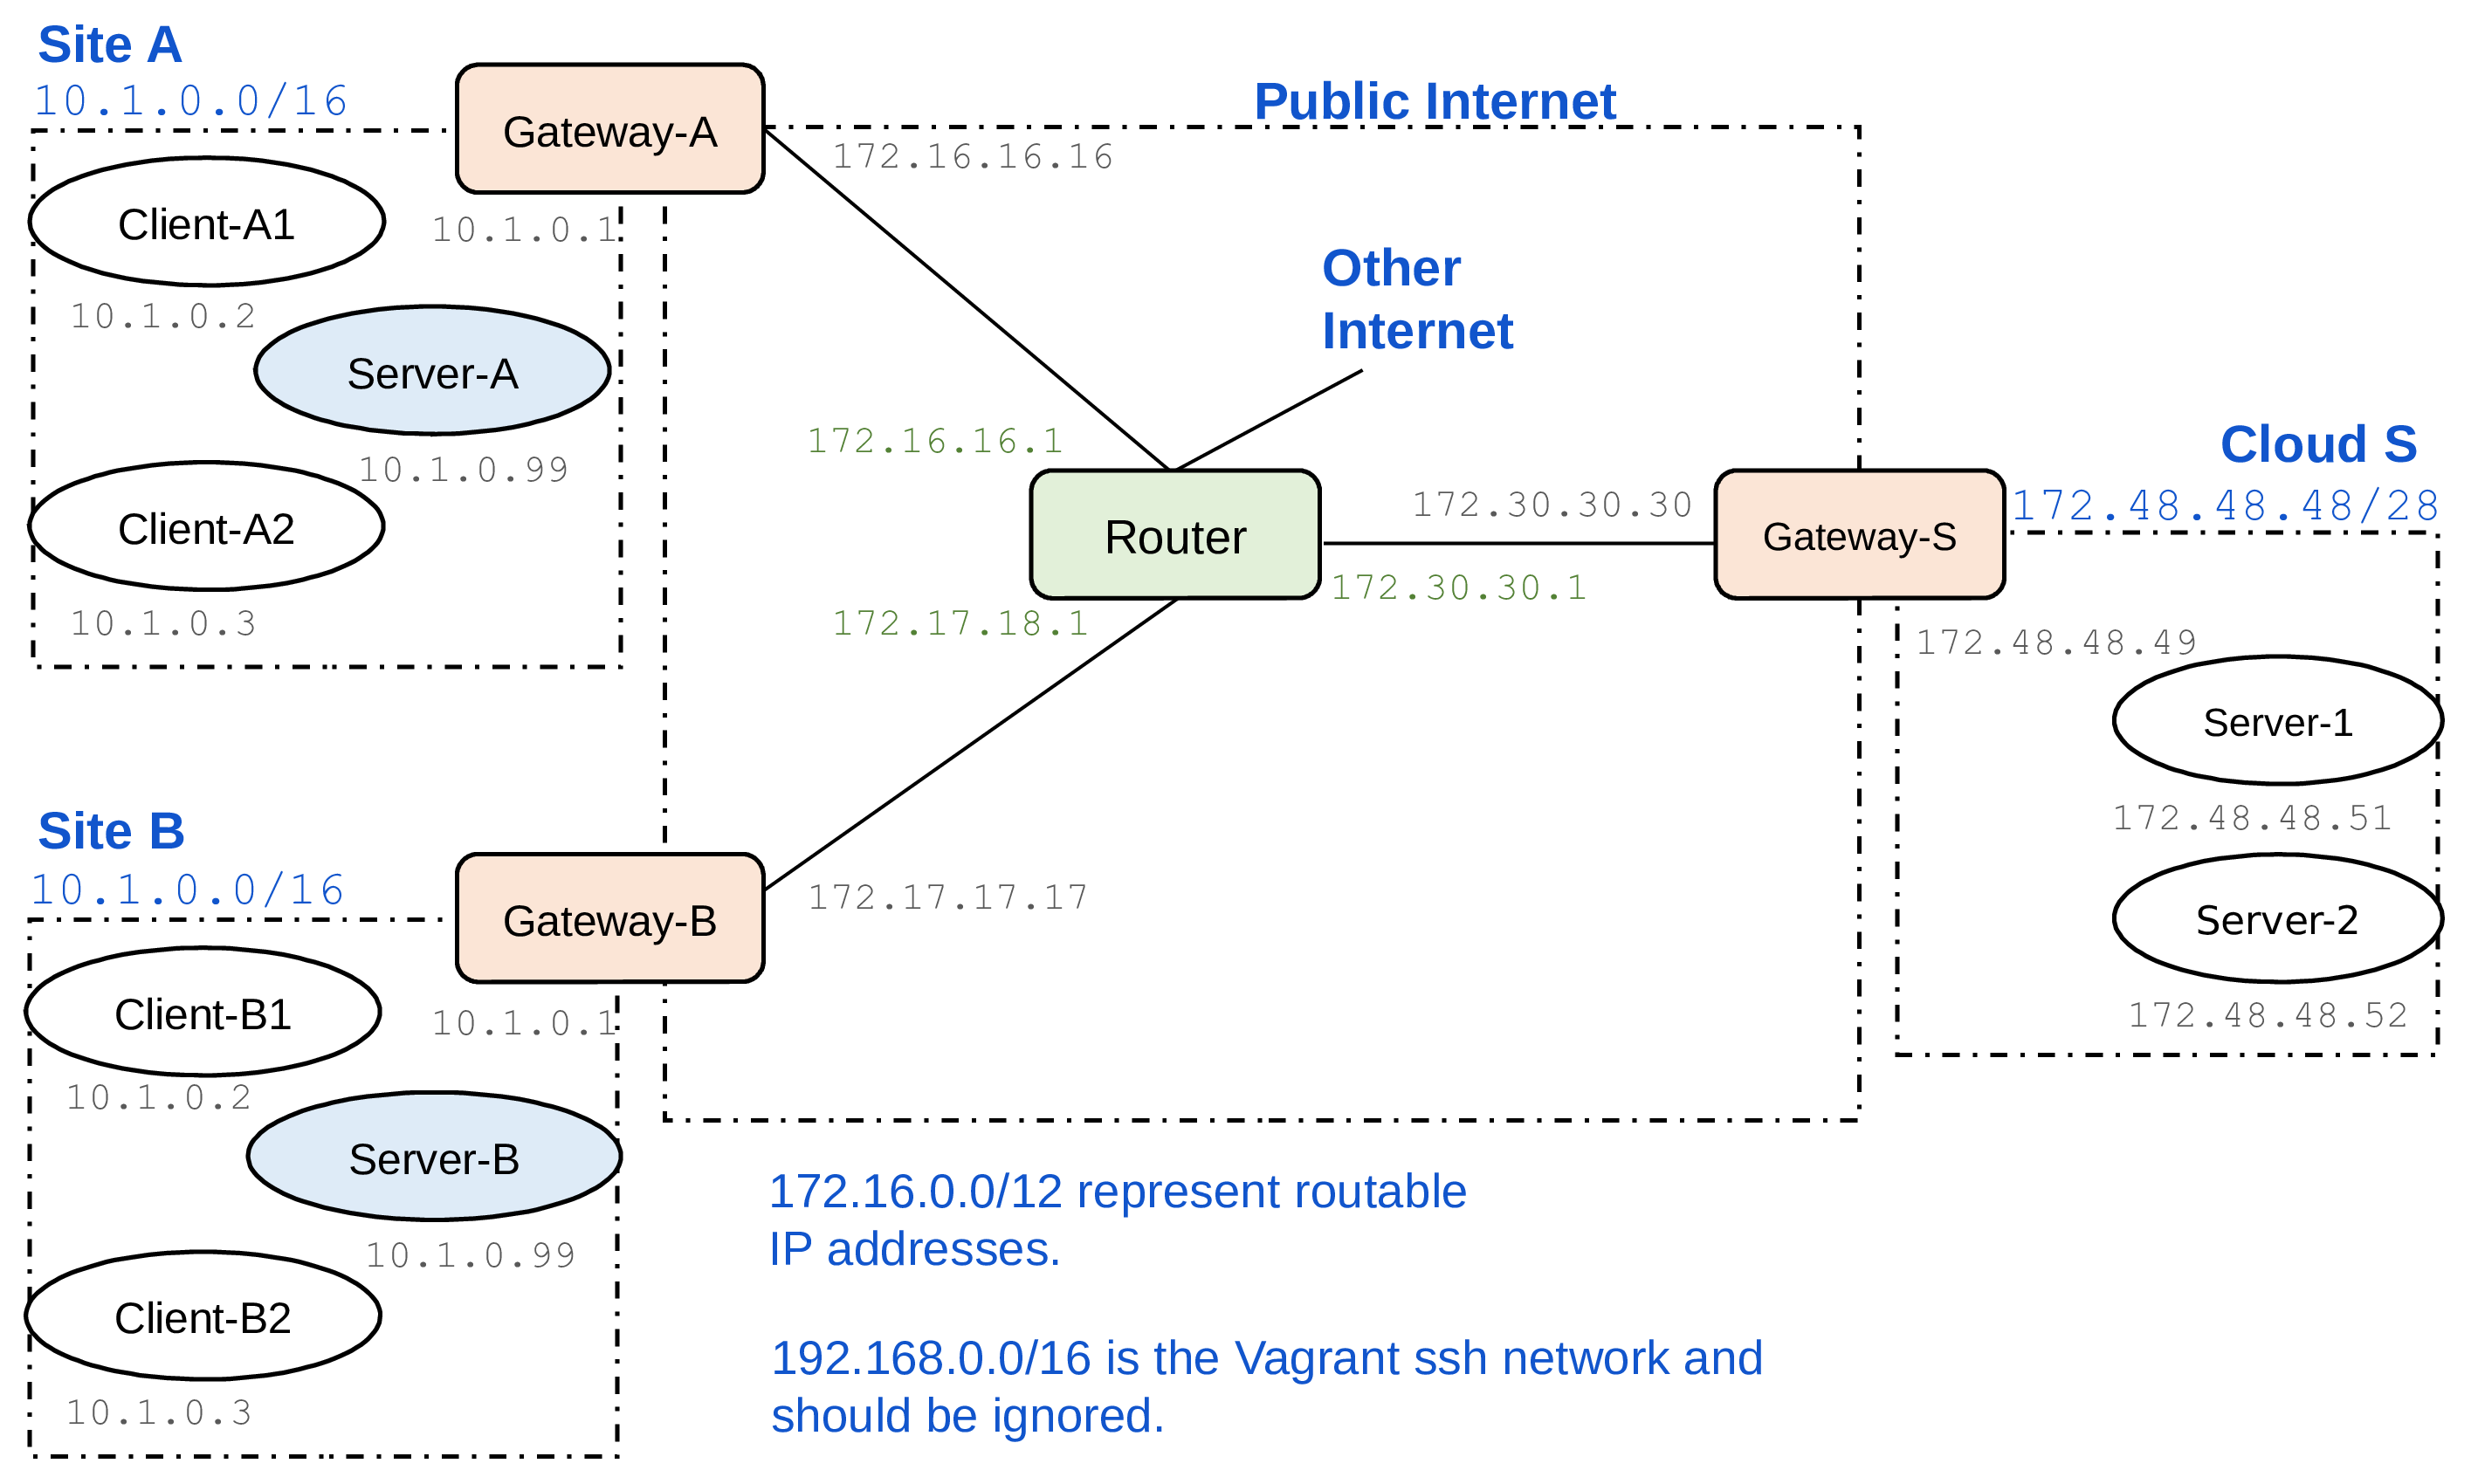
The testbed is initially configured so that the clients (IoT devices) in each customer’s network access a local server. Your goal is to relocate the server functionality from the customers’ local networks to a cloud platform, which is represented by the network on the right-hand side. The Router in the above topology represents routing across the Internet between the customer sites and the cloud. We can enable an ipsec tunnel connecting the client sides and server sides by configuring VPN connections and firewall rules on the gateway routers.
The customer’s local network uses the private IP address range 10.1.0.0/16. The client gateways have NATs. The cloud-side gateway, on the other hand, is currently a simple gateway router with no NAT or even firewall configured. The address space 172.16.0.0/12 simulates public, routable IPv4 addresses (even though it really is a private address range). The cloud servers in this case are configured with routable IP addresses. This way, the clients can start communication with the data center, but not the other way around. You may want to change this so that the cloud servers are in a private address space, both for better security and to save on IPv4 addresses.
Router
The Router VM simulates the public Internet between the sites. It also provides a connection to the real Internet, which is needed for downloading software. To enable the routing, you need to start at minimum the client or server VM, the corresponding gateway VMs, and the Router VM. Then, connections from the client or server VM will be routed to the real Internet via the Router.
Client and Server Apps
In each customer site, i.e. IoT client network, there is one VM (S) with the IP address 10.1.0.99 that currently acts as the local server. The server app is placed in the VM at /home/vagrant/server-app on the server. It is written in NodeJS. Use vagrant ssh to connect to the server VM, go to the server app directory, and run npm start to start the server. Once it is started, it listens on port 8080 for HTTP requests. Similarly, the client app is placed inside each client VM at /home/vagrant/client-app. When you start the client app, it tries to send requests to the local server once a second. You can edit the configuration file config.json to change the server address, e.g. to send the requests to a cloud server. You may modify client and server app and their configuration as needed for moving the server functionality to the cloud, but one goal is to keep the changes relatively small.
Modification
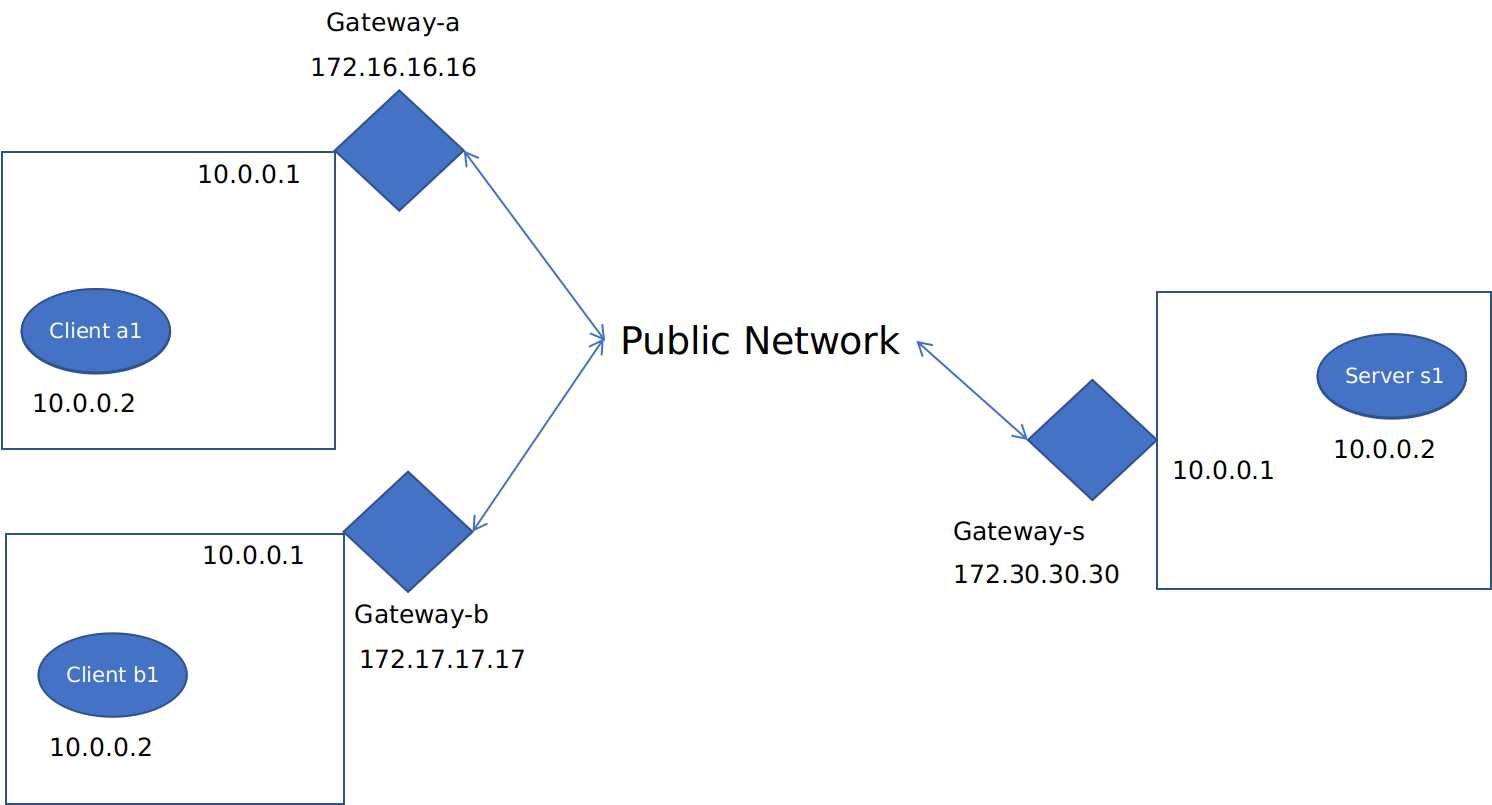
Add NAT support for servers
Firstly we need to enable the NAT on the gateway-s to protect our servers. And since we want client nodes to communicate with cloud servers, we can prune out the those servers within clients’ local network. Now the network structure looks like this:
How do ipsec and iptables work?
A typical workflow of iptables is as follows:
All packages arriving inbound at the router will go through the PREROUTING table first, there the router will check the package’s destination inside the header and decide where the package will go next.
After PREROUTING, the xfrm state check whether the package is a ipsec encapsulation or not. If there’s a match, the corresponding package will go up into the decipher process. After being deciphered, the package will return to the PREROUTING for another check.
Things are pretty much the same when it comes to the POSTROUTING chain, where packages comming out from the POSTROUTING chain will be examined by the xfrm to see if there’s a match for ipsec encapsulation.
iptables rules and strongswan configuration
Client Gateway
iptables rules
#!/usr/bin/env bash

## NAT traffic going to the internet
sudo route add default gw 172.16.16.1
# iptables -t nat -A POSTROUTING -o enp0s8 -j MASQUERADE

# enable clinet-to-internet
sudo iptables -t nat -A POSTROUTING -s 10.0.0.0/24 -j SNAT --to-source 172.16.16.16

## Save the iptables rules
sudo iptables-save > /etc/iptables/rules.v4
sudo ip6tables-save > /etc/iptables/rules.v6
ipsec configuration
# ipsec configuration
sudo cat>/etc/ipsec.conf<<EOF
config setup

conn %default
	ikelifetime=60m
	keylife=20m
	rekeymargin=3m
	keyingtries=1
	authby=secret
	keyexchange=ikev2
	mobike=no

conn cloud-sitea
	left=172.16.16.16
	leftsubnet=172.16.16.16/32
	leftid=@sitea
	right=172.30.30.30
	rightsubnet=172.30.30.30/32
	rightid=@cloud
	auto=add
EOF

sudo cat>/etc/ipsec.secrets<<EOF
@sitea @cloud : PSK 0sv+NkxY9LLZvwj4qCC2o/gGrWDF2d21jL

@sitea %any : PSK 0x45a30759df97dc26a15b88ff

@cloud : PSK "This is a strong password"

: PSK 'this is the password'

172.16.16.16 : PSK   "sitea"
EOF

sudo cat>/etc/strongswan.conf<<EOF
charon {
  load = random nonce aes sha1 sha2 curve25519 hmac stroke kernel-netlink socket-default updown
  multiple_authentication = no
}
EOF
Server Gateway
iptables rules
#!/usr/bin/env bash

# NAT Traffic going to the internet
sudo route add default gw 172.30.30.1

# outbound
sudo iptables -t nat -A POSTROUTING -s 10.0.0.0/24 -j SNAT --to-source 172.30.30.30

# DNAT with policy matching with ipsec
sudo iptables -t nat -A PREROUTING -d 172.30.30.30 --match policy --pol ipsec --dir in -j DNAT --to-destination 10.0.0.2

# Save the iptables rules
sudo iptables-save > /etc/iptables/rules.v4
sudo ip6tables-save > /etc/iptables/rules.v6
ipsec configuration
# ipsec configuration
sudo cat>/etc/ipsec.conf<<EOF
config setup

conn %default
	ikelifetime=60m
	keylife=20m
	rekeymargin=3m
	keyingtries=1
	authby=secret
	keyexchange=ikev2
	mobike=no

conn cloud-sitea
	left=172.30.30.30
	leftsubnet=172.30.30.30/32
	leftid=@cloud
	leftfirewall=yes
	right=172.16.16.16
	rightsubnet=172.16.16.16/32
	rightid=@sitea
	auto=add

conn cloud-siteb
	left=172.30.30.30
	leftsubnet=172.30.30.30/32
	leftid=@cloud
	leftfirewall=yes
	right=172.17.17.17
	rightsubnet=172.17.17.17/32
	rightid=@siteb
	auto=add
EOF

sudo cat>/etc/ipsec.secrets<<EOF
@sitea @cloud : PSK 0sv+NkxY9LLZvwj4qCC2o/gGrWDF2d21jL

@siteb @cloud : PSK 0sv+NkxY9LLZvwj4qCC2o/gGrWDF2d21jL
EOF

sudo cat>/etc/strongswan.conf<<EOF
charon {
  load = random nonce aes sha1 sha2 curve25519 hmac stroke kernel-netlink socket-default updown
  multiple_authentication = no
}
EOF
One can start the ipsec negotiation by the following commands:
sudo ipsec restart && sudo ipsec up cloud-sitea && sudo ipsec up cloud-siteb
Now the ipsec tunnels have been started, you can use tcpdump to record communications go through the router:
16:40:53.922026 IP 172.16.16.16 > 172.30.30.30: ESP(spi=0xcb60dec4,seq=0x42), length 104
16:40:53.953376 IP 172.16.16.16 > 172.30.30.30: ESP(spi=0xcb60dec4,seq=0x43), length 104
16:40:54.145052 IP 172.16.16.16 > 172.30.30.30: ESP(spi=0xcb60dec4,seq=0x44), length 104
16:40:54.145082 IP 172.16.16.16 > 172.30.30.30: ESP(spi=0xcb60dec4,seq=0x45), length 104
16:40:54.927406 IP 172.16.16.16 > 172.30.30.30: ESP(spi=0xcb60dec4,seq=0x46), length 104
16:40:54.944949 IP 172.16.16.16 > 172.30.30.30: ESP(spi=0xcb60dec4,seq=0x47), length 104
16:40:54.944969 IP 172.16.16.16 > 172.30.30.30: ESP(spi=0xcb60dec4,seq=0x48), length 104
16:40:55.169508 IP 172.16.16.16 > 172.30.30.30: ESP(spi=0xcb60dec4,seq=0x49), length 104
16:40:55.169531 IP 172.16.16.16 > 172.30.30.30: ESP(spi=0xcb60dec4,seq=0x4a), length 104
In addition, on the cloud gateway, the ipsec policy can be found with ipsec statusall command.
vagrant@gateway-s:~$ sudo ipsec statusall
Status of IKE charon daemon (strongSwan 5.6.2, Linux 4.15.0-143-generic, x86_64):
  uptime: 3 minutes, since May 28 09:42:45 2021
  malloc: sbrk 1323008, mmap 0, used 291024, free 1031984
  worker threads: 11 of 16 idle, 5/0/0/0 working, job queue: 0/0/0/0, scheduled: 6
  loaded plugins: charon random nonce aes sha1 sha2 curve25519 hmac stroke kernel-netlink socket-default updown
Listening IP addresses:
  192.168.120.15
  172.30.30.30
  10.0.0.1
Connections:
 cloud-sitea:  172.30.30.30...172.16.16.16  IKEv2
 cloud-sitea:   local:  [cloud] uses pre-shared key authentication
 cloud-sitea:   remote: [sitea] uses pre-shared key authentication
 cloud-sitea:   child:  172.30.30.30/32 === 172.16.16.16/32 TUNNEL
 cloud-siteb:  172.30.30.30...172.17.17.17  IKEv2
 cloud-siteb:   local:  [cloud] uses pre-shared key authentication
 cloud-siteb:   remote: [siteb] uses pre-shared key authentication
 cloud-siteb:   child:  172.30.30.30/32 === 172.17.17.17/32 TUNNEL
Security Associations (2 up, 0 connecting):
 cloud-siteb[2]: ESTABLISHED 3 minutes ago, 172.30.30.30[cloud]...172.17.17.17[siteb]
 cloud-siteb[2]: IKEv2 SPIs: e6dc37e3e1532b3f_i* 13da6b4b7b02096a_r, pre-shared key reauthentication in 47 minutes
 cloud-siteb[2]: IKE proposal: AES_CBC_128/HMAC_SHA2_256_128/PRF_HMAC_SHA2_256/CURVE_25519
 cloud-siteb{2}:  INSTALLED, TUNNEL, reqid 2, ESP SPIs: c7172111_i cda09a5d_o
 cloud-siteb{2}:  AES_CBC_128/HMAC_SHA2_256_128, 0 bytes_i, 0 bytes_o, rekeying in 10 minutes
 cloud-siteb{2}:   172.30.30.30/32 === 172.17.17.17/32
 cloud-sitea[1]: ESTABLISHED 3 minutes ago, 172.30.30.30[cloud]...172.16.16.16[sitea]
 cloud-sitea[1]: IKEv2 SPIs: 48fa756acfb358d1_i* 13575783a73ca121_r, pre-shared key reauthentication in 50 minutes
 cloud-sitea[1]: IKE proposal: AES_CBC_128/HMAC_SHA2_256_128/PRF_HMAC_SHA2_256/CURVE_25519
 cloud-sitea{1}:  INSTALLED, TUNNEL, reqid 1, ESP SPIs: cac16581_i cffec20c_o
 cloud-sitea{1}:  AES_CBC_128/HMAC_SHA2_256_128, 4741 bytes_i (55 pkts, 205s ago), 6105 bytes_o (55 pkts, 205s ago), rekeying in 11 minutes
 cloud-sitea{1}:   172.30.30.30/32 === 172.16.16.16/32